Overview:
Author: Diyaa
Published date: August 3rd, 2024
Last updated: August 16th, 2024
This article is documentation of the basic CLI system configuration commands for VyOS Router.
Command Line Syntax:
Operational Mode:
Note
The
#sign after the hostname indicate that you are in editing mode. This is known as configuration mode on VyOS.
You will see the console look like this after you enter configure mode. This indicates that you are now in config mode. You can use the VyOS command line syntax to make changes to the system configuration.
vyos@vyos:~$ configure
[edit]
vyos@vyos#
Configuration Mode:
Note
The
:~$sign after the hostname indicate that you are not in config mode. This is known as operational mode on VyOS.
You must type the command below to go into configure mode.
vyos@vyos:~$ configureOperational Mode Commands in Configuration Mode:
Tip
Using this command in configuration mode allows you to run operational mode commands from configuration mode without having to exit back out to operational mode.
vyos@vyos# run show configuration commandsSave Configuration:
You must commit the configuration changes to merge them into the running configuration. You can save the running configuration to the startup configuration after merging the changes into the running configuration.
Commit Configuration Changes:
Tip
Utilize the commit comments to allow for easier system configuration revision review.
This command will merge the system changes into the running system configuration. However, This is not going to merge your configuration changes to the startup config. This means that your changes are not going to persist a reboot.
vyos@vyos# commit comment "Changing syetm interface"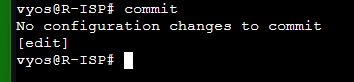
Show Uncommitted Configuration:
Running the following command in configuration mode will show you what changes have not been committed to the system configuration yet.
vyos@vyos# compare saved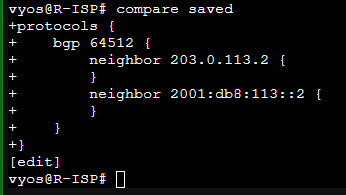
Save Configuration to Disk:
Tip
Keep in mind that this command will not merge uncommitted changes. You must merge the changes by committing them as shown in this section.
You need to use the following command to save your configuration and merge it to the system startup config on the disk.
vyos@vyos# save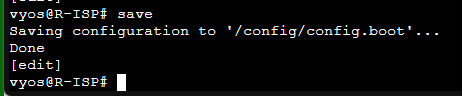
Show Configuration:
You can use the following command to show the full system configuration in configure mode:
vyos@vyos# showThe following command will allow you to see the configuration of the router in command line style:
vyos@vyos# run show configuration commandsChange Configuration Mode Hierarchy Level:
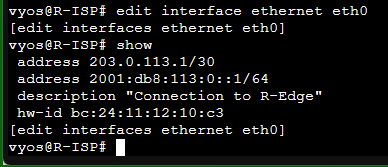
You can change the hierarchy level in configuration mode by using the edit command:
vyos@vyos# edit interface ethernet eth0As you can see now we are in the ethernet eth0 section of the config:
To exit out of the hierarchy configuration you can use the exit command:
vyos@vyos# exitChange hostname:
vyos@vyos# set system host-name vyosChange Interface Address:
Physical Interface Configuration:
Tip
Once again let tab completion be your friend.
vyos@vyos# set interface ethernet eth0 address 203.0.113.1/30
vyos@vyos# set interface ethernet eth0 address 2001:db8:113:0::1/64
vyos@vyos# set interface ethernet eth0 description "Primary connection to Edge router"
Dummy Interface Configuration:
Note
This interface is similar to a loopback interface. You can create multiple dummy interfaces and route their addresses. You can not create aliases to the loopback interface as you would with Cisco IOS.
vyos@vyos# set interface dummy dum1 address 192.0.2.1/32
vyos@vyos# set interface dummy dum1 address 2001:db8::1/128
vyos@vyos# set interface dummy dum1 description "Routed SSH management and BGP router ID"
Show Interfaces Configuration:
Running the following command in configuration mode will show the configuration on all the interfaces:
vyos@vyos# run show interfaces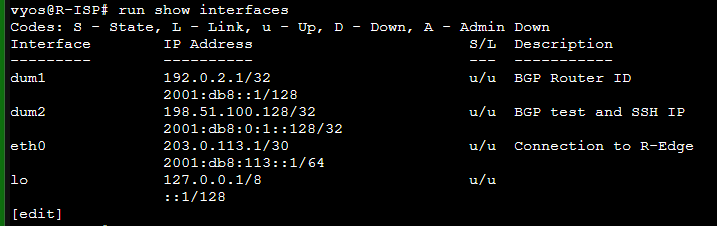
Configure Static Routes:
Note
This is the simplest way to setup a static route to get the router access to the internet. Use tab completion to see more of the command syntax.
vyos@vyos# set protocols static route 0.0.0.0/0 next-hop 1.1.1.1Configure Local User:
Note
Tip
Let tab completion be your friend.
- I am using ed25519 SSH keys. You need to change the command to match the SSH key format you have.
- Replace the SSH with your own key.
- The user password will be hashed and stored in the configuration after you set it.
vyos@vyos# set system login user vyos authentication plaintext-password "P@ssw0rd"
vyos@vyos# set system login user vyos authentication public-keys "user@host" type ssh-ed25519
vyos@vyos# set system login user vyos authentication public-keys "user@host" key "AAAAC3NzaC1lZDI1NTE5AAAAIGjS9Ic88GN9s3fdouvR3b/VKJCFVXs8u8EXjBecdAC"
Customize SSH Service:
Set SSH listen address and port:
vyos@vyos# set service ssh listen-address 198.51.100.1/32
vyos@vyos# set service ssh listen-address 2001:db8::1
vyos@vyos# set service ssh port 22
Set the allowed SSH MACs:
vyos@vyos# set service ssh mac hmac-sha2-512-etm@openssh.com
vyos@vyos# set service ssh mac hmac-sha2-256-etm@openssh.com
vyos@vyos# set service ssh mac hmac-sha2-512
vyos@vyos# set service ssh mac hmac-sha2-256
Set allowed SSH ciphers:
vyos@vyos# set service ssh ciphers chacha20-poly1305@openssh.com
vyos@vyos# set service ssh ciphers aes256-gcm@openssh.com
vyos@vyos# set service ssh ciphers aes128-gcm@openssh.com
Set System Configuration Revisions:
Note
My example below will save up to 100 revisions.
This command allows you to set how many system configuration revisions must be saved on the disk. You can rollback the configuration if you make a mistake.
# Must run in coniguration mode
vyos@vyos# set system config-management commit-revisions 100
You can show system revisions in operational mode:
vyos@vyos# show system commitRestore Default Configuration:
Warning
This will disconnect you if you are connected remotely to the VyOS router.
Load the default config:
vyos@vyos# load /opt/vyatta/etc/config.boot.defaultCommit your change:
vyos@vyos# commit comment "restoring default config"Save the configuration:
vyos@vyos# saveDynamic Routing Commands:
BGP:
Set the BGP autonomous system number instance:
vyos@vyos# set protocols bgp 64512Configure neighbors:
vyos@vyos# set protocols bgp 64512 neighbor 203.0.113.2 remote-as 64512
vyos@vyos# set protocols bgp 64512 neighbor 2001:db8:113::2 remote-as 64512
Set the BGP router ID:
vyos@vyos# set protocols bgp 64512 parameters router-id 192.0.2.1Redistribute connected routes into BGP:
vyos@vyos# set protocols bgp 64512 address-family ipv4-unicast redistribute connectedRedistribute default route into BGP neighbor:
vyos@vyos# set protocols bgp 64512 neighbor 203.0.113.2 address-family ipv4-unicast default-originateRelated Notes:
- Link to Home-Page.
References:
VyOS 1.3 quick start documentation VyOS documentation - configuration navigation VyOS BGP setup documentation